Create Cluster
A Yeedu cluster is the compute unit that runs your jobs and notebooks. This page documents every field on the New Cluster form as it appears in Yeedu v2.10.1.
Accessing Cluster Creation
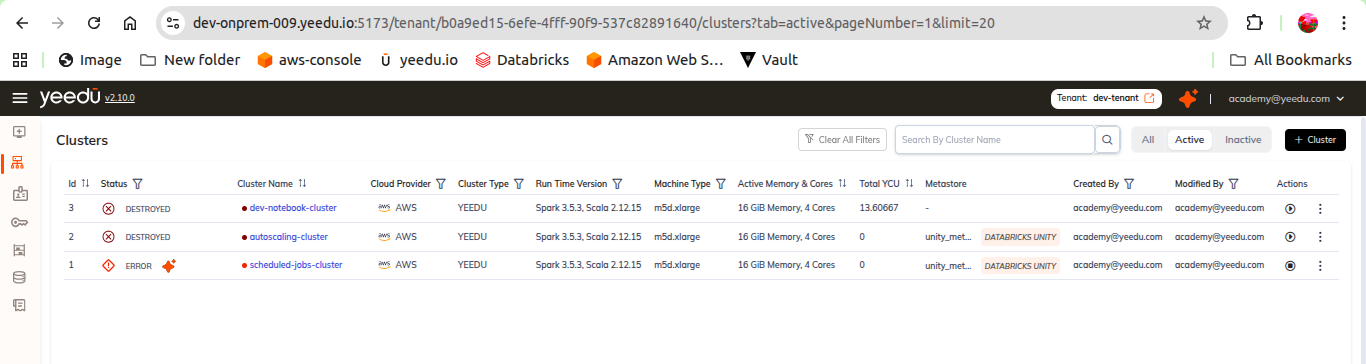
- Navigate to Clusters in the tenant navigation panel.
- Click the + Cluster button (top-right, above the Actions column).
- The form opens at
/tenant/<tenant-id>/create-clusterwith the breadcrumb Clusters > New Cluster.
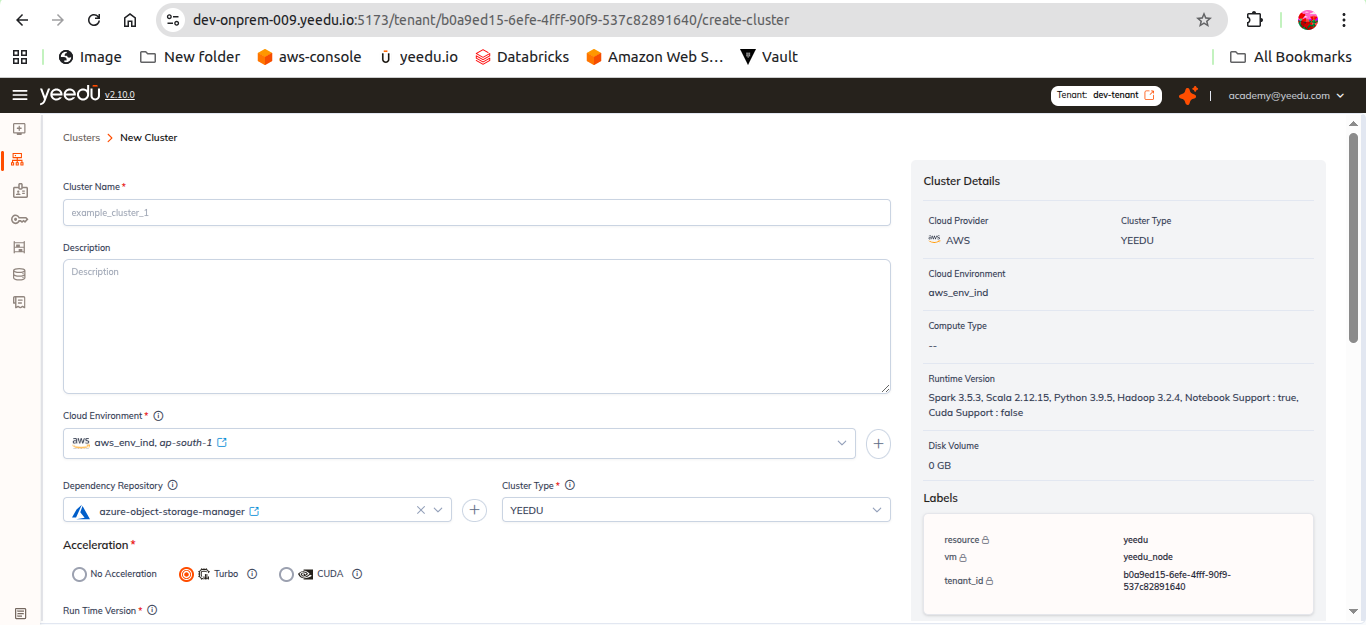
The page uses a two-column layout:
- Left column – the cluster configuration form.
- Right column – a live CLUSTER DETAILS summary card that updates as you fill the form.
Field Order
The form presents fields in this order. Fields marked * are required.
| # | Field | Control |
|---|---|---|
| 1 | Cluster Name* | Text |
| 2 | Description | Textarea |
| 3 | Cluster Type* | Dropdown |
| 4 | Cloud Environment* | Dropdown + inline create |
| 5 | Acceleration* | Radio group |
| 6 | Dependency Repository | Dropdown (clearable) + inline create |
| 7 | Run Time Version* | Dropdown |
| 8 | Compute* | Select Compute modal |
| 9 | Min Instances* / Max Instances* / Number of Parallel Execution* | Numeric |
| 10 | Auto Shutdown | Numeric (minutes) |
| 11 | Labels | Key/value rows |
| 12 | Metastore | Dropdown + inline create |
| 13 | Mounts, Spark Config, Advanced Options | Collapsible sections |
Basic Details
Cluster Name
- Required. Placeholder:
example_cluster_1. - Max length: 64 characters.
- Allowed: lowercase letters,
-,_,@,.
Description
- Optional free-text description of the cluster.
Cluster Type
The Cluster Type dropdown offers exactly three values (these are the literal values shown in the UI and used by the Cluster Type filter on the Clusters list):
| Value | Notes |
|---|---|
YEEDU | Fully managed Spark environment optimized for CPU performance; runs Spark in local mode. |
STANDALONE | Standalone Spark deployment. |
CLUSTER | Cluster-mode Spark deployment. |
Note: Cluster type cannot be modified after creation.
Cloud Environment
The Cloud Environment* dropdown selects an existing cloud environment. Alongside the dropdown are:
- Open in new – opens the selected cloud environment in a new tab.
- Show details (eye) – expands the environment's details inline.
- + – opens the Create Cloud Environment modal without leaving the form.
Supported cloud providers
Yeedu v2.10.1 supports five providers:
| Provider | Notes |
|---|---|
| OCI | Oracle Cloud Infrastructure. |
| OnPrem | On-premises environment backed by Proxmox VE. |
| GCP | Google Cloud Platform. |
| AWS | Amazon Web Services. |
| Azure | Microsoft Azure. |
Cloud environment fields
Every cloud environment has these common fields:
- Cloud Environment Name*
- Description
- Cloud Provider*
- Credential*
- Network*
- Boot Disk Image*
- Labels
The remaining fields depend on the provider:
| Provider | Provider-specific fields |
|---|---|
| OCI | Availability Domain* |
| OnPrem | End Point* (for example https://onprem-host:8006/, the Proxmox VE port) and OnPrem Nodes* (select nodes, with a Fetch Nodes action) |
| GCP | Availability Zone*, Project ID* |
| AWS | Availability Zone*, Account ID* |
| Azure | Availability Zone*, Resource Group* |
Credential types
When creating a credential inline, the Cloud Provider is locked to the parent form's provider. Each provider exposes exactly one credential type, except OnPrem, which exposes two.
| Provider | Credential Type | Fields |
|---|---|---|
| OCI | OCI API Key Pair | Tenancy OCID*, User OCID*, Fingerprint*, Compartment OCID*, Private Key File* (.pem upload / drag-and-drop) |
| OnPrem | Proxmox Basic Auth | Username* (the UI appends @pam to the username), Password* |
| OnPrem | Custom S3a Credentials | Access Key ID*, Custom S3a Endpoint*, Secret Access Key* |
| GCP | Google Service Account | Credentials* (service-account JSON) |
| AWS | AWS Access Secret Key Pair | Access Key ID*, Default Region* (dropdown), Secret Access Key* |
| Azure | Azure Service Principal | Client ID*, Tenant ID*, Client Secret*, Subscription ID*, Storage Account Name*, Container Name* |
Cloud Permissions Required by Each Credential
The credential you attach to a cloud environment is the principal Yeedu acts as. Our provisioning engine uses it in two passes: Terraform creates and destroys the node, its disks and its network attachment, and the cloud SDK then starts, stops and inspects that node for the rest of its life.
Everything below comes from the Terraform we actually run, one module per cloud, plus the SDK calls the engine makes around it. So the tables are short on purpose. We never create a VPC, a subnet, a security group, a resource group or a Proxmox datastore for you, because those are inputs you supply on the cloud environment and we only read them.
Missing permissions surface late. The form accepts the credential and the failure lands during cluster bootstrap, not at submit time.
| Credential type | Cloud | What the credential provisions |
|---|---|---|
| OCI API Key Pair | OCI | Compute instances, block volumes, a VNIC on your subnet |
| Proxmox Basic Auth | OnPrem | Proxmox VE guests, their disks, a cloud-init snippet |
| Custom S3a Credentials | OnPrem | Nothing. Object storage access only |
| Google Service Account | GCP | Compute instances, persistent disks, a reserved internal address |
| AWS Access Secret Key Pair | AWS | EC2 instances, EBS volumes, an imported key pair, CloudWatch log groups |
| Azure Service Principal | Azure | Linux VMs, managed disks, a NIC, optional Azure Monitor wiring |
We derive these permission sets from the resources our Terraform declares and the SDK calls our engine makes. Yeedu doesn't ship a ready-made IAM policy, role definition or Proxmox role for any cloud, so treat each list as the minimum we know a deployment needs and widen it if your organisation's guardrails require more.
OCI: OCI API Key Pair
The Tenancy OCID, User OCID, Fingerprint and private key authenticate an API signing key. The Compartment OCID scopes every resource we create.
| Terraform declaration | Kind | Created when |
|---|---|---|
oci_identity_availability_domains | data | Always. Resolves the Availability Domain you picked to its full OCI name |
oci_core_instance | resource | Always. Carries the VNIC, which reads your subnet and optional NSGs |
oci_core_volume | resource | One per disk in Disks Config, while the node runs or the scratch disk is kept |
oci_core_volume_attachment | resource | One per volume above |
Scope the policy to the compartment named on the credential. The availability-domain lookup is the one statement that has to sit at tenancy level:
Allow group YeeduClusterProvisioners to inspect availability-domains in tenancy
Allow group YeeduClusterProvisioners to manage instance-family in compartment <compartment-name>
Allow group YeeduClusterProvisioners to manage volume-family in compartment <compartment-name>
Allow group YeeduClusterProvisioners to use subnets in compartment <compartment-name>
Allow group YeeduClusterProvisioners to use vnics in compartment <compartment-name>
Add this only when your cloud environment supplies network security groups:
Allow group YeeduClusterProvisioners to use network-security-groups in compartment <compartment-name>
Spot needs nothing extra on OCI. The preemptible configuration is a field on the instance, so
manage instance-family already covers it. Cloud logging setup is skipped entirely for OCI, which
is why no logging statement appears above.
OnPrem: Proxmox Basic Auth
The Username, to which the UI appends @pam, and the Password authenticate against the
Proxmox VE API at your End Point. Unlike every other provider, on-prem start and stop go
through Terraform rather than an SDK, by toggling the guest's started flag.
| Terraform declaration | Kind | Created when |
|---|---|---|
proxmox_virtual_environment_nodes | data | Always. Lists cluster nodes so we can pick one with free CPU and memory |
proxmox_virtual_environment_vms | data | Per selected node. Reads existing guests and their tags to compute headroom |
proxmox_virtual_environment_file | resource | Always. The cloud-init user-data, written as a snippet on the local datastore |
proxmox_virtual_environment_vm | resource | Always. Boot disk plus one disk per entry in Disks Config, on local-lvm |
A role covering the guest lifecycle, both datastores and node audit is enough:
pveum role add YeeduClusterProvisioner -privs \
  "VM.Allocate,VM.Audit,VM.Config.CPU,VM.Config.Cloudinit,VM.Config.Disk,VM.Config.HWType,\
VM.Config.Memory,VM.Config.Network,VM.Config.Options,VM.Monitor,VM.PowerMgmt,\
Datastore.Audit,Datastore.AllocateSpace,Datastore.AllocateTemplate,Sys.Audit"

pveum acl modify / -user yeedu@pam -role YeeduClusterProvisioner
VM.Monitor is there because we enable the QEMU guest agent and read the guest's IPv4 address back
through it. Sys.Audit covers the node listing. Datastore.AllocateTemplate is what permits the
snippet upload.
The snippet upload is easy to overlook. We write the node's cloud-init user-data to the local
datastore, so that datastore must both accept the Snippets content type and be writable by this
account. Otherwise the guest gets created and never bootstraps.
OnPrem: Custom S3a Credentials
This one provisions nothing. It never reaches a Terraform provider, and no resource in any module reads it.
What it does is authenticate the cluster node against an S3-compatible object store, in Yeedu's own
on-prem setup a Ceph RADOS Gateway. The node's bootstrap exports the key pair as
AWS_ACCESS_KEY_ID, AWS_SECRET_ACCESS_KEY and S3_ENDPOINT, then configures Spark with
org.apache.hadoop.fs.s3a.S3AFileSystem and path-style access against that endpoint.
| Field | Used as |
|---|---|
| Access Key ID | S3 access key on the node and in the Spark S3A config |
| Secret Access Key | S3 secret key |
| Custom S3a Endpoint | spark.hadoop.fs.s3a.endpoint, with path.style.access set to true |
Its permissions come from your object store's own bucket policy, not from any cloud IAM. Grant read
and write on the buckets you reference: the bucket behind a Dependency Repository, and the bucket in
each s3:// or s3a:// mount source. Read-only mounts need read alone.
An OnPrem cloud environment still needs a Proxmox Basic Auth credential to provision anything.
GCP: Google Service Account
The service-account JSON authenticates Terraform, and by default the same account is attached to the
node as its identity with the cloud-platform scope. That second use is why iam.serviceAccountUser
appears below.
| Terraform declaration | Kind | Created when |
|---|---|---|
google_compute_address | resource | Always. A reserved internal IP in your subnet, purpose GCE_ENDPOINT |
google_compute_instance | resource | Always. GPUs attached when CUDA acceleration is selected |
google_compute_disk | resource | Per disk in Disks Config, unless the disk type is local-ssd or scratch-disk |
google_compute_attached_disk | resource | One per disk above |
Two predefined roles cover the baseline. Grant them on the project named on the cloud environment:
roles/compute.instanceAdmin.v1
roles/iam.serviceAccountUser
If you'd rather define a custom role, this is the permission set our modules and SDK calls exercise:
compute.instances.create
compute.instances.delete
compute.instances.get
compute.instances.start
compute.instances.stop
compute.instances.attachDisk
compute.instances.detachDisk
compute.instances.setMetadata
compute.instances.setLabels
compute.instances.setTags
compute.instances.setServiceAccount
compute.disks.create
compute.disks.delete
compute.disks.get
compute.disks.use
compute.addresses.create
compute.addresses.delete
compute.addresses.get
compute.addresses.use
compute.subnetworks.use
compute.images.useReadOnly
compute.zoneOperations.get
iam.serviceAccounts.actAs
Three cases add to that. When the cloud environment's network project differs from its Project ID,
the account needs roles/compute.networkUser on the network project, because we configure a second
provider pointed at it. When Enable Public IP is on, add compute.subnetworks.useExternalIp.
When CUDA is selected, add compute.acceleratorTypes.get and make sure the GPU quota exists in
the zone.
Nothing on the GCP path creates logging infrastructure. Our engine treats cloud logging setup as a no-op for GCP.
AWS: AWS Access Secret Key Pair
| Terraform declaration | Kind | Created when |
|---|---|---|
aws_subnet | data | Always. Reads the availability zone of the subnet you supplied |
aws_key_pair | resource | Always. Imports Yeedu's public key, one key pair per node |
aws_instance | resource | On-demand nodes only |
aws_spot_instance_request | resource | Spot nodes only |
aws_ebs_volume | resource | Per disk in Disks Config, while the node runs or the scratch disk is kept |
aws_volume_attachment | resource | One per volume above |
aws_ec2_tag | resource | Spot nodes only. Copies the label set onto the fulfilled instance |
On top of that, the engine calls StartInstances, StopInstances and DescribeInstances directly,
because restarting an instance that already exists through the SDK takes a couple of seconds where a
full Terraform cycle takes closer to a minute, and it resolves an instance by its Name tag before
starting it, which is why DescribeTags sits in the baseline alongside the describe calls for
instances, images, volumes and subnets. It also creates nine CloudWatch log groups if they don't
already exist: yeedu_bootstrap_log, yeedu_unstructured_log, yeedu_usi_reactors_logs,
yeedu_log_collector_reactors, yeedu_log_collector_history_server,
yeedu_copy_object_storage_logs, yeedu_workspace_files_sync_logs,
yeedu_usi_reactors_monitor_logs and yeedu_usi_telegraf_logs.
Here's the baseline policy for an on-demand cluster.
{
  "Version": "2012-10-17",
  "Statement": [
    {
      "Sid": "YeeduNodeLifecycle",
      "Effect": "Allow",
      "Action": [
        "ec2:RunInstances",
        "ec2:TerminateInstances",
        "ec2:StartInstances",
        "ec2:StopInstances",
        "ec2:DescribeInstances",
        "ec2:DescribeInstanceAttribute",
        "ec2:DescribeInstanceTypes",
        "ec2:DescribeImages",
        "ec2:DescribeSubnets",
        "ec2:ImportKeyPair",
        "ec2:DescribeKeyPairs",
        "ec2:DeleteKeyPair",
        "ec2:CreateVolume",
        "ec2:DeleteVolume",
        "ec2:DescribeVolumes",
        "ec2:AttachVolume",
        "ec2:DetachVolume",
        "ec2:CreateTags",
        "ec2:DescribeTags",
        "ec2:DeleteTags"
      ],
      "Resource": "*"
    },
    {
      "Sid": "YeeduLogGroups",
      "Effect": "Allow",
      "Action": [
        "logs:DescribeLogGroups",
        "logs:CreateLogGroup"
      ],
      "Resource": "*"
    }
  ]
}
Turning on Spot Instances (Experimental) switches the module to a spot request, and immediately
after fulfilment we call ModifyInstanceMetadataOptions on the new instance to enable metadata
tags:
{
  "Sid": "YeeduSpotNodes",
  "Effect": "Allow",
  "Action": [
    "ec2:RequestSpotInstances",
    "ec2:DescribeSpotInstanceRequests",
    "ec2:CancelSpotInstanceRequests",
    "ec2:ModifyInstanceMetadataOptions"
  ],
  "Resource": "*"
}
Attaching an instance profile through the cloud environment's cloud identity needs iam:PassRole
for that role, since the profile name is passed straight to RunInstances.
Leave the cloud identity empty and the node falls back to these same keys for its own work. The
bootstrap script then exports them into the node's environment, and the credential additionally
needs s3:GetObject and s3:ListBucket on the Yeedu software bucket, logs:CreateLogStream and
logs:PutLogEvents for the awslogs agent, and ecr:GetAuthorizationToken plus
ecr:BatchGetImage, ecr:GetDownloadUrlForLayer and ecr:BatchCheckLayerAvailability if your
container images live in ECR. Attaching an instance profile is the cleaner option.
Azure: Azure Service Principal
The Client ID, Tenant ID, Client Secret and Subscription ID authenticate the service principal. The Resource Group on the cloud environment is where every VM resource lands.
| Terraform declaration | Kind | Created when |
|---|---|---|
azurerm_subnet | data | Always. Looked up by name in the network resource group |
azurerm_network_interface | resource | Always |
azurerm_public_ip | resource | Only when Enable Public IP is selected |
azurerm_linux_virtual_machine | resource | Always. Priority flips to Spot for spot clusters |
azurerm_managed_disk | resource | Per disk in Disks Config, while the node runs or the scratch disk is kept |
azurerm_virtual_machine_data_disk_attachment | resource | One per disk above |
azurerm_virtual_machine_extension | resource | Logging only. Installs AzureMonitorLinuxAgent |
azurerm_monitor_data_collection_rule | data | Logging only. Reads yeedu_usi_bootstrap_dcr and yeedu_usi_container_dcr |
azurerm_monitor_data_collection_rule_association | resource | Logging only. Three associations per node |
azurerm_monitor_data_collection_endpoint | data | Logging only |
azurerm_log_analytics_workspace | data | Logging only |
Baseline actions for a custom role scoped to the subscription:
Microsoft.Resources/subscriptions/resourceGroups/read
Microsoft.Compute/virtualMachines/read
Microsoft.Compute/virtualMachines/write
Microsoft.Compute/virtualMachines/delete
Microsoft.Compute/virtualMachines/start/action
Microsoft.Compute/virtualMachines/deallocate/action
Microsoft.Compute/disks/read
Microsoft.Compute/disks/write
Microsoft.Compute/disks/delete
Microsoft.Network/networkInterfaces/read
Microsoft.Network/networkInterfaces/write
Microsoft.Network/networkInterfaces/delete
Microsoft.Network/networkInterfaces/join/action
Microsoft.Network/virtualNetworks/read
Microsoft.Network/virtualNetworks/subnets/read
Microsoft.Network/virtualNetworks/subnets/join/action
If you prefer built-in roles, Virtual Machine Contributor plus Network Contributor on the resource group is the closest fit to that list.
Public IP is the smallest add-on. Turn it on and the module creates and later deletes an
azurerm_public_ip:
Microsoft.Network/publicIPAddresses/read
Microsoft.Network/publicIPAddresses/write
Microsoft.Network/publicIPAddresses/delete
Microsoft.Network/publicIPAddresses/join/action
Logging is the larger one. With it enabled, we create the custom log tables
yeedu_usi_bootstrap_logs_CL and yeedu_usi_container_logs_CL in your Log Analytics workspace,
create a data collection endpoint and two data collection rules, associate all three with the VM,
and install the monitor agent extension:
Microsoft.Compute/virtualMachines/extensions/read
Microsoft.Compute/virtualMachines/extensions/write
Microsoft.Compute/virtualMachines/extensions/delete
Microsoft.Insights/dataCollectionEndpoints/read
Microsoft.Insights/dataCollectionEndpoints/write
Microsoft.Insights/dataCollectionRules/read
Microsoft.Insights/dataCollectionRules/write
Microsoft.Insights/dataCollectionRuleAssociations/read
Microsoft.Insights/dataCollectionRuleAssociations/write
Microsoft.Insights/dataCollectionRuleAssociations/delete
Microsoft.OperationalInsights/workspaces/read
Microsoft.OperationalInsights/workspaces/tables/read
Microsoft.OperationalInsights/workspaces/tables/write
Monitoring Contributor plus Log Analytics Contributor covers that block. One last case: if
the cloud environment supplies a user-assigned managed identity as its cloud identity, the service
principal also needs Microsoft.ManagedIdentity/userAssignedIdentities/assign/action on that
identity. With no cloud identity set, the VM gets a system-assigned identity instead and nothing
extra is required.
Acceleration
Acceleration* is a required radio group with three options:
| Option | Description |
|---|---|
| No Acceleration | Standard CPU execution, no acceleration layer. |
| Turbo | Yeedu's Turbo acceleration engine. |
| CUDA | GPU (CUDA) acceleration. |
The selected value is reflected in the CLUSTER DETAILS panel, and surfaces on the Job and Notebook forms as Turbo Acceleration: Enabled / Disabled.
Check the support badges on the Run Time Version row (see below) to confirm the runtime you pick advertises Cuda or Turbo support before selecting the matching acceleration mode.
Dependency Repository
Dependency Repository is an optional, clearable dropdown with a + button to create a new
repository inline. It references a repository defined in the tenant-level Dependency Repositories
module (/tenant/<tenant-id>/dependency-management).
The inline create form (Dependency Repository > New Repository) has these fields:
| Field | Values / notes |
|---|---|
| Repository Name* | Text |
| Description | Text |
| Cloud Provider* | OnPrem | GCP | AWS | Azure — note that OCI is not offered here, even though cloud environments do support OCI |
| Credential Name* | Dropdown of credentials for that provider, with a + to create one inline |
| Bucket Name* | Placeholder e.g., my-deps-bucket |
Footer actions on that form: Reset, Create.
Run Time Version
Run Time Version* is a required dropdown. Each row in the list renders two groups:
- Version: Spark, Scala, Python and Java versions — for example
3.5.3, 2.12.15, 3.9.5, 3.2.4. - Support: capability badges, each shown with a tick or a cross:
- Notebook
- Cuda
- Turbo
- Thrift Support
Use the badges to confirm a runtime supports the workload you intend to run on the cluster.
Compute
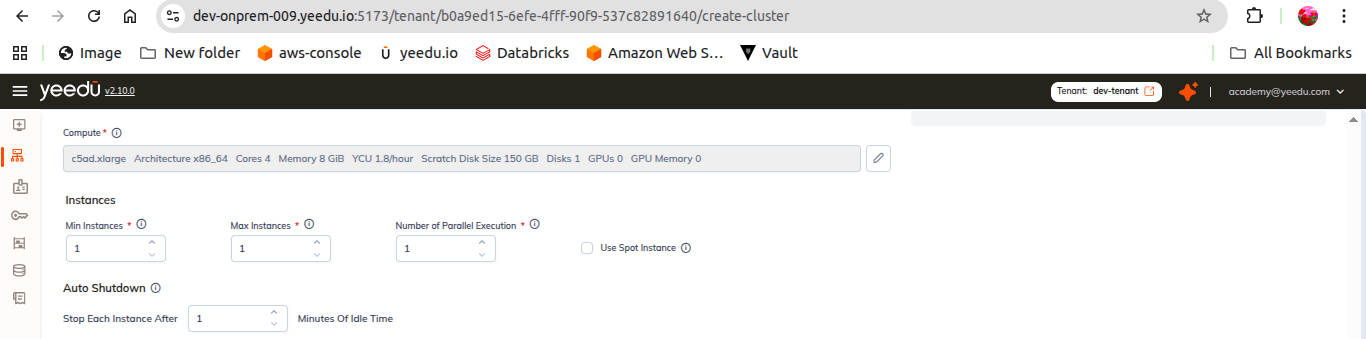
Compute* is its own required field (it is not part of the instance settings). Click Select Compute to open the Select Compute modal, or + to define a new compute shape.
Select Compute modal
The modal header states the architecture type, for example: Select Compute ( Architecture type : x86_64 ).
Every column is sortable and has its own filter input:
| Column | Filter placeholder |
|---|---|
| Name | Search By Name |
| Cores | Min cores |
| Memory | e.g., 256 GiB |
| Scratch Disk Size | Scratch Disk / Size |
| No Of Disks | — |
| Total Disks Size | — |
| YCU/hr | Max YCU |
| GPUs | Min GPUs |
| GPU Memory | e.g., 48 GiB |
Rows are grouped under category headers. The categories depend on the selected cloud environment — on an OnPrem environment the groups are CUSTOM COMPUTE and GENERAL PURPOSE.
Select a single row with its radio button, then click Select.
Instances
| Field | Description |
|---|---|
| Min Instances* | Minimum number of instances kept running. |
| Max Instances* | Upper bound the cluster can scale to. |
| Number of Parallel Execution* | Maximum number of concurrent executions per instance. |
Note: there is no Workers per Node field in v2.10.1 — Number of Parallel Execution is the concurrency control on this form.
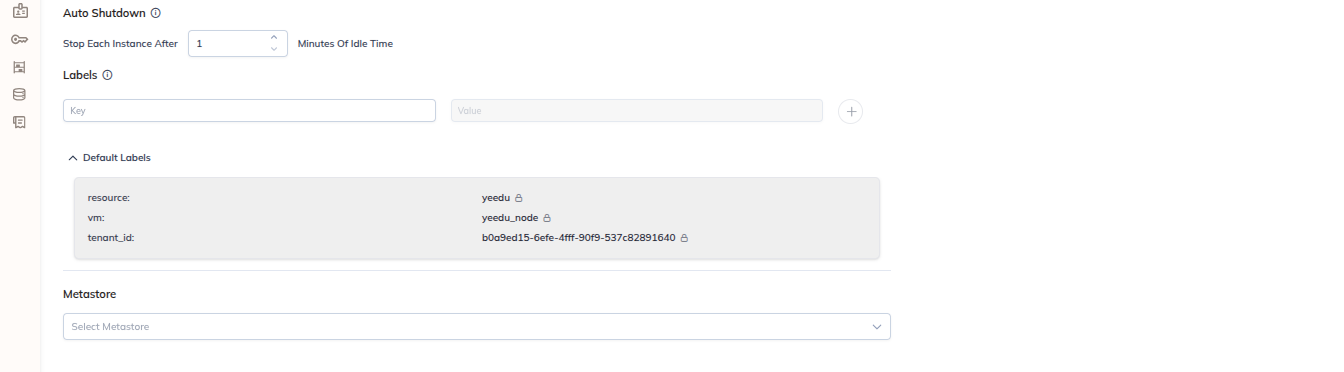
Auto Shutdown
- Reads "Stop Each Instance After
<n>Minutes Of Idle Time". - Each instance is stopped once it has been idle for the configured number of minutes.
Labels
- Add labels as key / value rows using the + button; remove a row with the trash icon.
- Placeholders:
e.g., team(key) ande.g., data-engineering(value).
Automatically Added Labels
A collapsible panel lists the labels Yeedu attaches to every cluster without any input from you:
| Label | Value |
|---|---|
resource | yeedu |
vm | yeedu_node |
tenant_id | The tenant UUID |
created_by | The creating user's email address |
yeedu_env | The Yeedu environment name |
Metastore
- Select Metastore dropdown, with + to create a metastore inline.
- Metastore types available in v2.10.1: AWS GLUE, DATABRICKS UNITY, HIVE.
- The selected metastore type is shown as a badge in the Metastore column of the Clusters list.
Mounts
A collapsible section. When nothing is attached it shows the empty state "No Mounts Selected" with two buttons:
- + New – create a new mount.
- Attach – attach an existing mount.

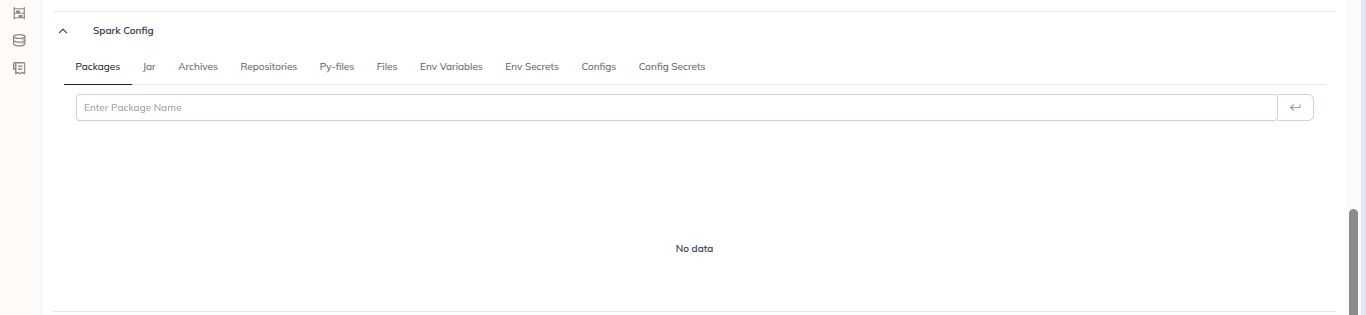
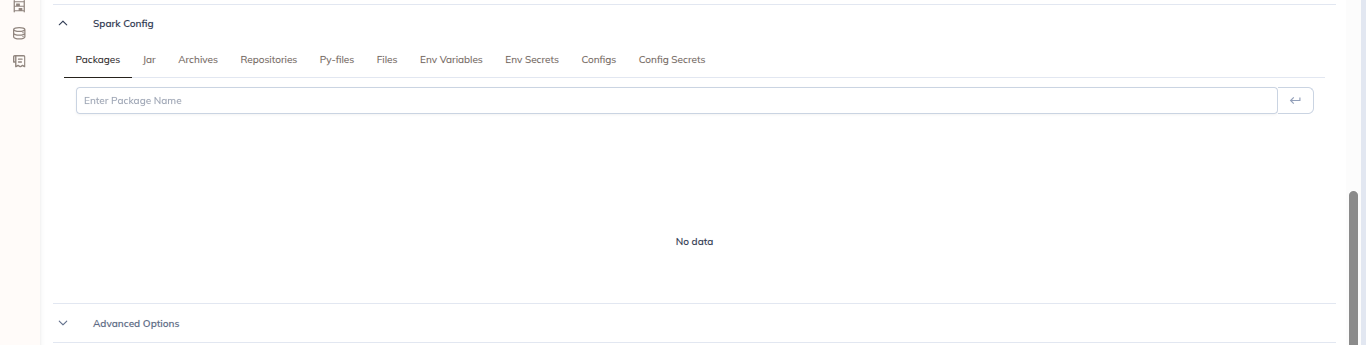
Spark Config
A collapsible section with 10 tabs:
| Tab | Purpose |
|---|---|
| Configs | Spark configuration key/value pairs. |
| Config Secrets | Configuration values sourced from secrets. |
| Packages | Maven/Spark packages. |
| Jars | JAR dependencies. |
| Archives | Archive files. |
| Repositories | Package repositories. |
| Py-files | Python file dependencies. |
| Files | Additional files. |
| Env Variables | Environment variables. |
| Env Secrets | Environment variables sourced from secrets. |
The Configs tab has a Bulk Edit toggle, plus Key/Value rows with + (add) and trash (delete).
Advanced Options
A collapsible section with 3 tabs: Init Script, Disks Config and Others.
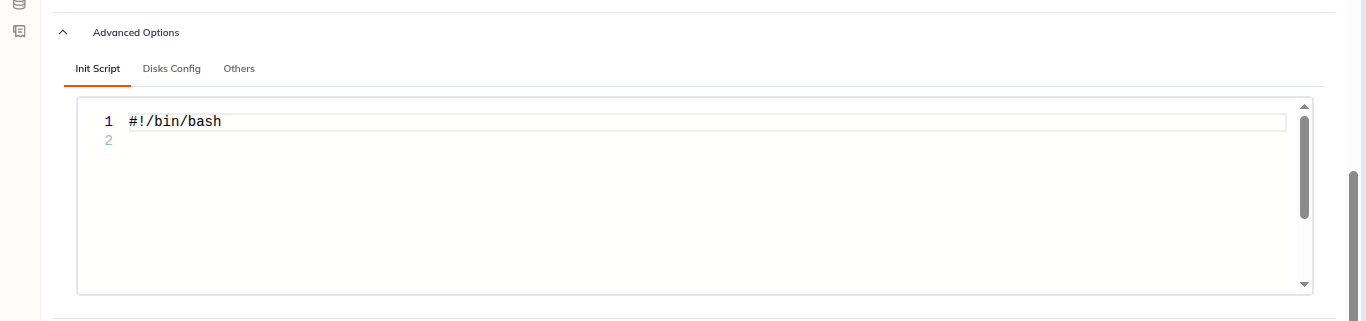
Init Script
A code editor with line numbers. Enter a script to run during node bootstrap.
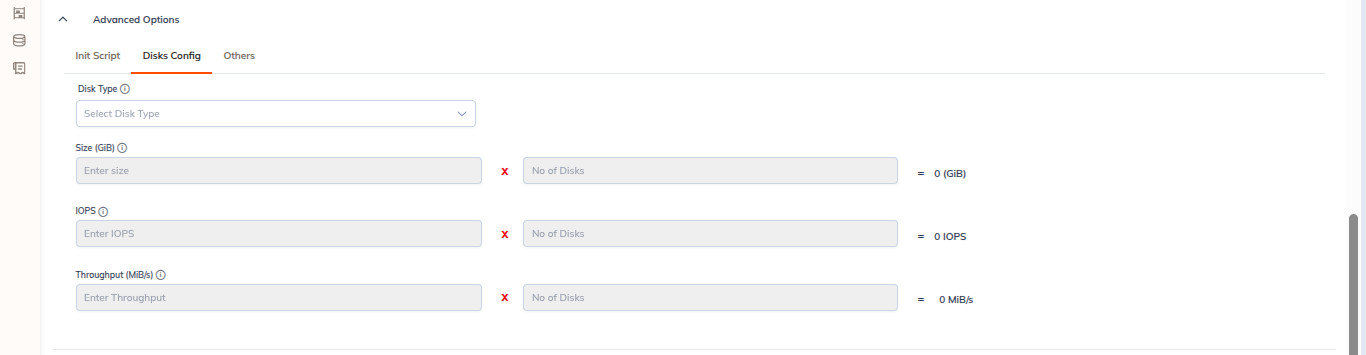
Disks Config
| Field | Notes |
|---|---|
| Disk Type | Dropdown. The available values are provider-specific — on an OnPrem cloud environment the only value is local-lvm. |
| Size (GiB) | Entered as size × quantity, with the computed total shown alongside. Helper text: "Enter size and quantity above". |
| IOPS | Provider-specific; not shown for OnPrem environments. |
| Throughput (MBps) | Provider-specific; not shown for OnPrem environments. |
Others
Termination Policy
- "Terminate Cluster After
<n>Minutes Of Inactivity." (the form ships with240). - Keep Scratch Disk – checkbox, enabled by default.
Manage And SSH Permissions
- Enable Public IP – checkbox.
Spot Instances (Experimental)
Provider-dependent: this section is not rendered for an OnPrem cloud environment. Availability on other providers depends on the selected cloud environment.
- Uses discounted VMs (70–90% cheaper).
- Best for stateless, retryable or batch workloads.
- Can be interrupted at any time — unsuitable for long-running jobs.
CLUSTER DETAILS Panel
The right-hand column shows a live preview of the cluster as you configure it:
- Cloud Provider
- Cluster Type
- Cloud Environment
- Compute Type
- Acceleration
- Disk Volume
- Runtime Version (with its capability badges)
- Labels
The same panel component appears on the Create Job and Create Notebook forms, where it summarises the cluster you have selected.
Actions
| Button | Behaviour |
|---|---|
| Reset | Clears all fields on the form. |
| Create | Creates the cluster without starting it. |
| Create & Start | Creates the cluster and immediately begins bootstrapping it. |
Backend bootstrap time: ~6–7 minutes Ready to use in: ~1 minute after creation